Homelab Chronicles 14: Backing up VMs with Veeam

I just realized Veeam is probably called that because of “VM.” Vee-M. Veeam. I’m a smart guy.

I’ve had Veeam Community Edition for awhile now. I’ve mainly used it to do one-off backups of ESXi VMs. I think the first time I used it was when I was resizing a VM. I think I made it too large and needed to shrink it down. Which will be a theme here. In case I messed up, I backed it up beforehand. Working directly with VM configuration files through text editors and CLI, there was a high chance of that. But I never had to rely on the backup, luckily.

My goal this time, however, was to setup regular, scheduled backups of my important VMs:

  • Windows Server DCs
  • Pi Hole
  • UPS VM
  • Ubuntu Server

I had a spare 4TB external HDD lying around, so I chose to use that as the storage repository. I could’ve gone the way of creating another VM and installing Veeam on it, but for some reason, that seemed…odd? I wouldn’t back up that “Veeam VM” anyway. But some cursory searching online yielded recommendations of using a separate physical device as the host. So that’s what I did.

I had an old Intel NUC that I rescued from eWaste from my last job as we were moving out. It was used to drive a display board in our lobby. It has 4GB of RAM, 120GB SATA SSD, and a Celeron Nxxx CPU. Not sure exactly what model. A bit scant on power, but it was fine for Ubuntu and Internet connectivity.

Photo of the Intel NUC.
The little Intel NUC that could. Maybe?

But enough for Veeam? And Windows 11? Only one way to find out.

I chose Windows 11 since the Windows 10 End of Life is in October. I’m slowly moving my devices that way, but that’s another story. Installing Windows 11 did take quite awhile. And even just signing-in to the desktop was slow.

After running Windows Updates, which again was slow, I wanted to install Veeam 12 Community Edition, the latest version. Unfortunately, Veeam’s website is awful. Trying to find the download link required me to give my email address. And I still didn’t get an email. Luckily, I saved the ISO of version 11, so I installed that version.

I connected the 4TB external drive to the NUC, and then in Veeam, added that as a backup repository. Following that, I tried adding my ESXi host, for which I had to provide username and password. All the VMs appeared!

Veeam sees all the VMs in ESXi.

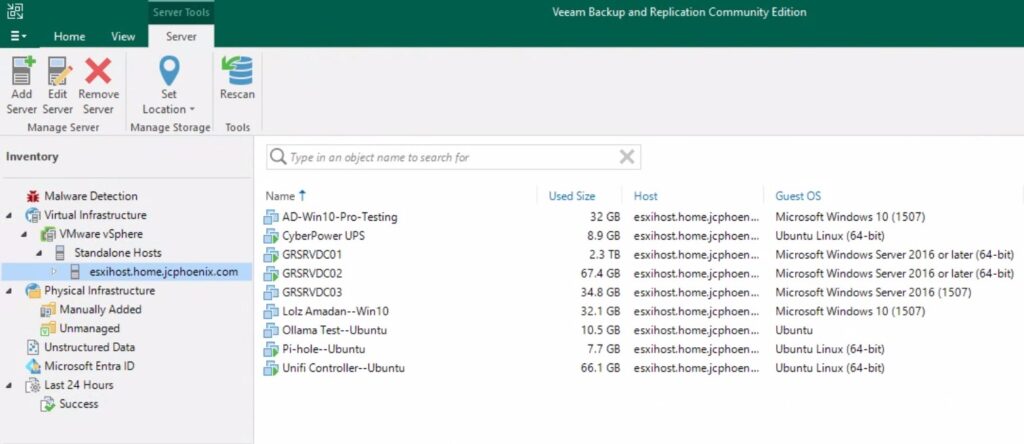
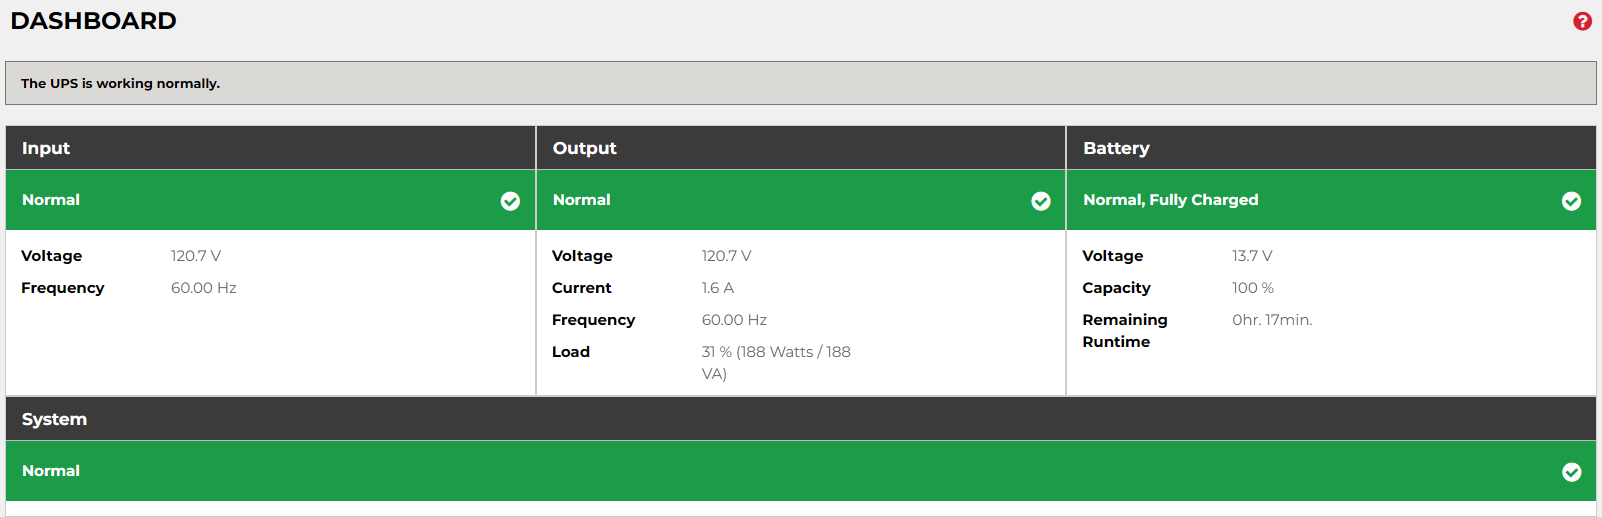
Next, I set up a test backup run. For this target, I chose a smaller VM: my Linux-based VM that hosted the UPS monitoring system. This VM was thin-provisioned at 20GB, but only about 7GB was being used at the time.

After a few minutes, it completed successfully! Lastly, I set up a schedule for daily backups. None failed for the the few days I let it run. I got some warnings, but they were about limited space on the ESXi host. Which I knew about; the ESXi datastore is like 90% filled.

After those successful backups, I decided to upgrade to the latest version. Unfortunately for me, I had to do a 2-step process up upgrades. My version of Veeam 11 was old enough that I couldn’t go directly to v12. I had to do an intermediate step.

Once that was done, and once I found the download link for Veeam 12, I attempted the installation. Sadly, when the installation was almost done, I received an error that some Veeam service couldn’t be started. I should note that this NUC was so slow, that it took forever to install. I’m talking at least 2hrs. I think it would’ve been faster with a beefier computer. So it took me a few days to try all this Anyway, after a reboot, I tried again to upgrade, but I got the same issue. This time, I took note of the service that wouldn’t start: some Veeam threat hunter. To be fair, the upgrade installer did warn me about potential issues with existing AV. I ended up turning off Windows Defender and system security during the installation. That seemed to solve the issues on my final upgrade attempt. I turned security back on afterwards.

With everything finally up-to-date and my test backup successful, it was time to do it for real. I had five VMs I wanted to backup. I could’ve set an individual backup job for each VM. But I also had the ability to include multiple VMs within a single job. Once again, I went to the Internet. I found a post on reddit, where the suggestion appeared to be grouping similar OSs together. Apparently this helped with deduplication, since many system files of VMs with similar OSs will be the same.

The downside, however, appeared to be potentially higher chances for corruption. If a backup job got corrupted, multiple VMs could be affected at the same time. But I figured since I was storage space-constrained with my 4TB external HDD, more deduplication would be more advantageous.

So I created two jobs:

  • 3 Linux-based OSs – Ubuntu Server, UPS VM, and Pi Hole; I called these “Services.”
  • 2 Windows Servers – the DCs and fileserver; I called these “Windows”.

I also had to set the schedule and retention. For both jobs, I chose weekly backups. One on Monday, the other on Wednesday, but both starting at midnight. For retention, I kept the following for Services:

  • 21 days of backups
  • 4 weekly full backups at all times.
  • 6 monthly full backups at all times.
  • 1 yearly full backup at all times.

While for Windows, I opted to keep backups for 21 days, with 1 yearly full backup kept at all times. I’d like to keep more, but I’m storage space constrained.

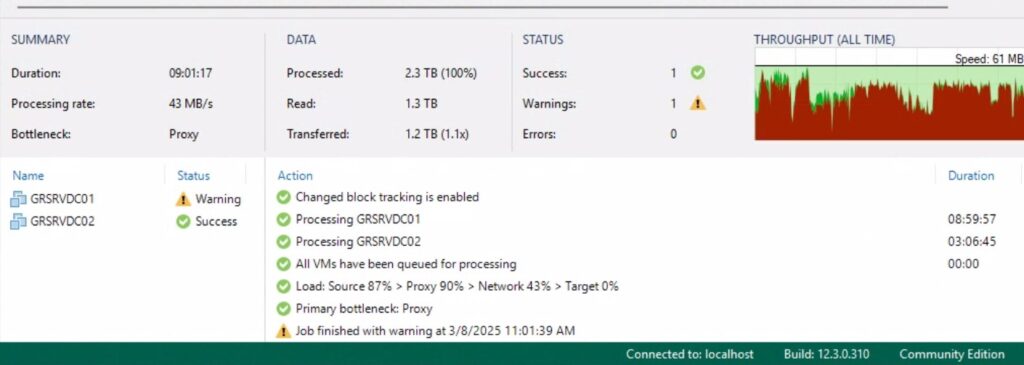
I then created my initial backup of each by running each job manually. Both were successful. The Windows backup was quote long at 9hrs. The main reason being that the primary Windows Server VM, which was also the fileserver, was thick-provisioned for 2.3TB. Even though I’m only using less than 1TB total. When I created the VM, I mistakenly chose thick-provisioning. Which is why the ESXi datastore is almost full. For reference, the secondary Windows Server VM is only about 80GB thin-provisioned.

Success on the Windows Server backups!

Which is a big reason I’m doing this. Because I need to resize that Windows Server VM. And before I do that, I want to make sure I have a backup. I also want to redo the physical server’s drive configuration. I want to add a new HDD to the virtual drive or RAID pool. Which for some reason, I can’t do right now. I’ve ordered a new RAID card to see if that’ll help.

I also want to think about the retention policy some more. I quickly set the number of retained full backups without really thinking too much about it.

That said, before I even do that, I really need to test the backup. Same with a Windows Server backup I’ve been doing on the primary server VM. But given my current storage constraints, I’m not even entirely sure how I’m going to do that. I think that’ll be the next thing I work on.

Homelab Chronicles 13: A Year in Review

As I said in my last post, I recently moved. Which mean that all the work I did in my last apartment is gone. That was mostly physical infrastructure work, particularly the cabling. So now I get to do it again; joy!

But before I get into the new place, I should visit some topics from the past. An update of sorts. Just because I haven’t posted in a year doesn’t mean the homelab has sat untouched for a year.

UPS Delivered!

Back in April, I finally bit the bullet. I bought a “CyberPower PFC Sinewave Series CP1000PFCLCD – UPS – 600-watt – 1000 VA.” I wanted something that would communicate with ESXi to initiate a “semi-graceful” auto-shutdown if wall power was lost.

PowerPanel dashboard, showing the UPS status as normal and full charged.

I say “semi-graceful” since with my setup, I only have ~17min of battery life. That covers three devices: my server, my Unifi Secure Gateway (USG), and a 5-port Unifi Flex-mini Switch.

Via the accompanying PowerPanel software, I can monitor battery status, while also configuring the shutdown behavior in for ESXi. I actually have PowerPanel installed as a separate VM in ESXi. Probably not the best idea, but it works.

Back to the semi-graceful shutdown, VMs sometimes take time to properly shutdown, especially Windows Server. So between ESXi and PowerPanel, I give some time for the VMs to gracefully shutdown. But if they don’t shutdown in time, then ungraceful shutdown of VMs occur, before ESXi gracefully powers down.

Took a bit of testing to get it all figured out, but it does work. At my last apartment, there were a couple of brief blackouts or brownouts. The UPS did exactly what it needed to do.

My (Home) Assistant Quit on Me

The very last post of 2023 was me futzing around with Home Assistant. I had a “concept of a plan” to automate some of my smart home devices.

After getting it installed, though, I didn’t really do much more with it. Stupid, I know.

Unfortunately, at some point towards the end of 2023 or beginning of 2024, the HAOS VM bit the dust.

“Failed to power on virtual machine…File system specific implementation of LookupAndOpen[file] failed.”

I don’t exactly know what happened, or when it happened. But I know there was a power outage one night. A storm, I think. Before I had my UPS…

I can’t say for certain the power outage was the reason. After all, it was at least a couple weeks later that I realized HAOS wasn’t turned on. When I tried turning it back on, I got that message, and have ever since.

I did look into this error message a little bit. But I think reinstalling HAOS is the better choice. Especially since I didn’t do any further setup anyway.

Glad I have the UPS now 🙂

Playing with Proxmox

Over the last year or two, the big news in the virtualization space is VMWare selling out to Broadcom. And Broadcom absolutely trying to squeeze out every last penny in licensing. Recently, AT&T disclosed that Broadcom was seeking a 1050% price increase on licensing.

I’m still using ESXi/vSphere 6.5 U3 on older than 10yrs old server. Which is fine, but at some point I’ll need to replace the hardware and software. Unfortunately, there are no more perpetual, free licenses for non-commercial purposes. I never even got a 7.0 license.

With that in mind, I thought it’d be interesting to play with Proxmox, which is a FOSS virtualization platform. As such, I installed it on another server I had lying around. Unlike ESXi, Proxmox is nowhere near as user friendly. And the documentation that’s available is pretty poor, in my opinion.

That’s one of the reasons FOSS sometimes annoys me: it’s often not very accessible to anyone who’s not already an expert. But that’s a topic for another post.

The first thing I wanted to do was connect my current NFS-based OS ISOs storage to Proxmox. This way, I wouldn’t have to use extra drive space on the new Proxmox server by copying over an ISO. If the data exists on the network, use it! This NFS share is hosted on my primary Windows Server VM.

I was able to point Proxmox to the NFS. However, Proxmox wanted to use its own directory structure within that NFS. I found that rather annoying. This wouldn’t be where the Proxmox VMs live, after all. It’s simply where the ISOs are. Why should I have to rearrange the directory structure and files just for Proxmox?

I honestly don’t remember if I created a VM after all that. I don’t remember if it worked or not. But given the situation with VMWare, that won’t be the last time I play with Proxmox.

Let’s Get Physical, Physical (Again)

The last thing to report is minor, but worth mentioning. I ended up adding two more Ethernet runs. The important one being from one room to another, underneath the carpet and along the baseboards. Ah, the joys of apartment living.

Anyway, that’s not that big of a deal. I had already done it once, after all.

Rather, it was the idea that led to this. In my old apartment, the Google Fiber jack (ONT) was in the living room. The guest room down the hall served as the “server closet.” The server, Unifi AP, main switch, UPS, and other devices were in the guest room. But the Unifi Secure Gateway (USG) was in the living room, since the Internet point of entry was there. Which seemed strange to me. I wanted all the main gear in the guest room.

It’s hard to explain without a map or diagram, so I’ll use some. This is the diagram of my original layout:

My original setup at my last apartment. Simple, if not a bit overkill.

To move the USG to the guest bedroom, there were two ways to achieve this. One was by adding a second run from the living room to the guest bedroom. One run would connect the fiber jack to the WAN side of the USG. The other run would connect from the LAN side of the USG back to the switch in the living room.

But I wondered if it was possible to do this:

Note that the USG doesn’t have that many ports; I forgot to add a second switch in that room, but the idea still stands.

Essentially, could a WAN connection go through a VLAN? Because if it could, I wouldn’t have to run another cable. I looked it up and even asked on reddit. And the answer was yes, this is entirely possible and not that unusual!

Unfortunately, when I tried to do this, it didn’t work. It even caused me some more issues with the Unifi controller being inaccessible while it wasn’t working.

In the end, I just laid a second down a second Ethernet run. Maybe I gave up too quickly, but sometimes the easiest solution…is simply the easiest solution 🤷‍♂️


So that was last year in the life of the homelab. Not as much as I wanted to do, but it was at least something. And that’s the point, right? To at least play around with it and learn something.